Welcome To My Blog

After ten years of hustle and bustle in Los Angeles, I have come to the quaint little town of Astoria, Oregon in search of some tranquility and self-exploration. With the captivating beauty of the Columbia River as a backdrop (and many rainy days) I am excited to spend time improving on my cooking skills, growing a garden and finally getting around to those creative projects I have put aside for so long.

Monday, December 10, 2012

Spray Painting Terracotta Pots

Terracotta pots are an inexpensive way to grow your plants. The dull clay color however is not very exciting to look at. To liven up my garden I decided to use spray paint to give the pots a vibrant splash of color.


I went to my local art supply store Dots 'N Doodles where the owners are always very helpful and discussed possible paints for terracotta pots. I was immediately drawn to the cool glossy colors of the Montana brand spray paint cans and settled on trying out the green. To get started on my project, I first covered the portion of the pot I was not painting with newspaper and used masking tape to hold it in place.


As I covered the lower part of the pot I made sure the tape was secured and that I covered everything up to the lip of the pot.


As you can see, the entire bottom part of the pot is fully covered. Since you should obviously never use spray paint inside the house,  I went out to the gazebo and laid out plenty of plastic on the patio table to use as my work space. 


I started with the pot tray. Since I was spraying both sides of the tray, I first first sprayed the top and set it aside to let it dry before flipping over to spray the bottom.


While I let the pot tray dry I turned to the actual pot and sprayed all the way around the lip of the pot making sure to let the paint settle in for fifteen to thirty seconds before applying an additional layer. 


After I was finished, I set the pot in the upright position to let it dry. After 15 minutes I went back to the pot tray and flipped it over and sprayed the other side.


I waited about an hour and then very gently felt the pot and the tray to make sure it was completely dry.  Although it felt dry, there was just a hint of stickiness which indicated they were not completely dry. As a precaution, I let them sit out another hour before bringing them inside.


Once inside and completely dry I used some potting soil and took a flower from my garden to plant in the spruced up pot.


As you can see, this simple project makes the world of difference when using terracotta pots for your plants and flowers. 


We went from this plain clay colored pot on the left to this vibrant green pot on the right.


My dog She-ra approves


Monday, November 26, 2012

Garden Update


It has been only 10 days since I planted seeds in my starter kit and already today I am transplanting the Swiss Chard to larger pots. To my amazement, the seeds started sprouting after only a couple days in the "mini greenhouse." Now, 10 days later the seedling are large enough to transfer to individual pots.


As you can see in the photo above, the four pellets on the right have surpassed all others in growth. These are the Swiss Chard seedlings which I will remove from the starter tray for continued growth in individual pots.


Here we see that four seedlings have sprouted in this particular pellet. In order to ensure the best chance at success, only the strongest seedling will be moved to the pot, the others will be cut away and discarded. Seems a bit harsh but such is the way of survival of the fittest.


I took four small pots of various sizes from the greenhouse outside and washed them out and filled with potting soil. I am using the various sized pots as a sort of experiment to determine how much of a difference pot size makes in the growth of these seedlings.


One by one, I trimmed each of the four Swiss Chard pellets so that only the one healthiest seedling remained. I then carefully cut away the protecting netting from the pellet and placed it in the middle of the pot and then gently covered it with soil.


After removing the four Swiss Chard seedlings, I placed the lid back on the starter tray and covered the other pellets. 


As you can see, the seedlings in the other pellets are definitely sprouting but are nowhere near ready to be transferred and so will remain in the starter tray a bit longer. Meanwhile, the Spinach and Swiss Chard seeds I planted in the individual mini pots have also started sprouting.

   
Spinach 


Swiss Chard 


Friday, November 16, 2012

Starting My Garden


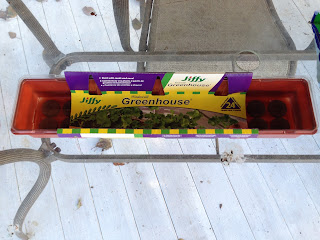
Unlike LA, where sun is plentiful, and seasons are all but non existent, starting a garden will be a bit trickier here in rainy Astoria. Fall is in full swing and the weather continues to get wetter and colder. Despite the weather obstacles, I am intent on getting started on my garden.  I figured I would start small and indoors so I went to my local hardware store and purchased a Jiffy Greenhouse seed starter kit. 


This is basically like a mini green house where you can start your seeds. The best part is that you can pretty much use this anywhere and don't need direct sunlight (which is lacking here in Astoria)


I have never used a starter kit before as I've always just sewn the seeds directly into pots and put them outside. That's something that will definitely not work with the rain, wind and chilly nights here in Astoria. I took the kit apart and read the instructions to get started, as it turns out, you don't even need soil. There are 24 small flat pellets in the tray each containing peat which will be used to cover and grow the seeds. First, the instructions call for 3.5 cups of water to be gradually added to the tray.


After I added the full amount of water I waited a few minutes as the pellets began to expand. As you can see in the picture below, the pellets pop out and create a small dome that is covered in a very thin netting that holds the peat together.


While I waited for the pellets to fully expand, I selected my seeds. With 24 pellets in the tray, I decided to use 6 types of seeds (4 pellets per type of seed). I chose Basil, Parsley, Thyme, Oregano, Lavender and Swiss Chard.


 Per the instructions, once all the water had been soaked up by the pellets I carefully pulled back the top of the netting and inserted 2-3 seeds in each pellet.


Once I inserted seeds into all 24 pellets I carefully fluffed each of the pellets and made sure that all the seeds were covered with peat.


The initial water I used will be all the seeds need at the moment, so no additional water or soil need to be added. The last thing to do is place the lid back on the tray and place the seeds in a warm place away from direct sunlight.


I addition to the seed try I thought it would be a good idea to sew some seeds the good old fashioned way and use mini pots and soil.


For these, I only used 4 types of seeds: Basil, Parsley, Swiss Chard and Spinach. In LA I tried growing Swiss Chard and Spinach on multiple occasions but it's simply too warm and the seedlings always withered and died as soon as we had consecutive days in the 80s. I'm hoping the cool weather here in Astoria will provide me with a different result.


I am obviously also starting these seeds indoors. Once they begin to sprout and harden, I plan on transferring them to bigger pots and placing them in the greenhouse.


Tuesday, November 13, 2012

What to do with Halloween Pumpkins

With Halloween a few weeks past and Thanksgiving quickly approaching it's probably time to get rid of those decorative pumpkins sitting on the doorstep. This year, instead sticking to tradition by carving Jack o' Lanterns, Ryan suggested we paint our pumpkins.


I have to say, this was a lot more fun and much less messy than carving Jack o' Lanterns. However, unlike Jack o' Lanterns, which wither and rot, these pumpkins are not going anywhere. Most pumpkins remain fresh and healthy for up to 8-12 weeks. So what to do with them? My first idea was to make pumpkin pie, however, as I quickly learned, this is the wrong type of pumpkins for pie. For that you need the sweet baby type. As an alternative, I decided to turn the seeds from these pumpkins into a delicious snack by toasting them in the oven.


I laid down newspaper to avoid mess and cut the top off the first pumpkin. I checked the inside to ensure it was still in good shape, which it was.


 Next came the icky part of scooping out the seeds. This was one of the reasons I avoided Jack o' Lanterns in the first place, and here I am 2 weeks after Halloween scooping out pumpkin guts. After the second pumpkin, it looked like I had more than enough seeds to toast so I didn't cut up the other two.


Now that I had my seeds, what to do with the remainder of the pumpkins. As I recently read, deer love the taste of pumpkin. Given the recent deer activity in my backyard I thought it would be a great idea to cut out the inner flesh of the pumpkins and leave them out as a treat for the deer.


I obviously took great care to only use the flesh from the inside of the pumpkin and not any of the outer flesh that had been painted. I chopped two of the pumpkins and put them in a small plastic bag and took it outside to an area where I've seen deer roaming. After placing the treat for the deer outside I returned to the seeds. First I made sure to rinse them thoroughly and then laid them out on a paper bag.


I sifted through the seeds and removed any pieces of pumpkin flesh stuck to the seeds. I washed them again and set them back in the bowl.


Next, I scooped out some butter and put it in the microwave for about a minute until it was almost thoroughly melted. I put the seeds in a clean bowl and mixed in the melted butter and a bit of salt.


After tossing the seeds with the melted butter and salt I laid them out in a large cookie sheet making sure to spread them into a single layer.


Next, I placed the cookie sheet in the oven, which had been preheated to 300 degrees and set the timer for 25 minutes. After the initial 25 minutes I took the cookie sheet out and tossed the seeds and added some more salt.


I set the timer another 15 minutes at which point I repeated the step above and then set the timer another 10 minutes. After a total of 50 minutes in the oven the seeds were crispy and brown which indicated they were done. I put the seeds in a plastic container, added a bit more salt and tossed. Voila a tasty treat for all to enjoy.


Sunday, November 11, 2012

The Rio Cafe

Since moving to Astoria I've been rather curious about the various Mexican restaurants in town. At the suggestion of our neighbor Donna, Ryan and I decided to try The Rio Cafe last night. Prior to heading over, we did some quick skimming of their reviews on Yelp. Their average is 4 out of 5 stars, but some of the newer reviews were a bit on the negative side, nevertheless we decided to give it a try.


The outside is somewhat inconspicuous, you wouldn't necessarily know this is a Mexican Food restaurant. The inside on the other hand is a bit more traditional. The owners do a good job recreating the atmosphere of a typical Mexican restaurant. In fact, it was so cozy in there that I almost forgot it was 36 degrees outside.


Some of the reviews we read mentioned a not so pleasant waitress, so I was curious as to what the service would be like. Our server came over to greet us and take our drink order. So far, very polite. Now, before I continue, being Mexican and living in Los Angeles for the past 10 years, the bar has been set very high for my taste in Mexican food and Margaritas. I will try to be fair with my review, but I also won't sacrifice some of the standards I've grown accustomed to. Having said that, I ordered a Gold Margarita on the rocks no salt to get things started.


The size of the margarita was definitely standard size and at $6 it's right for the money. I take my first sip. Something doesn't taste quite right so I take a few other sips. It's definitely strong enough so I know it's not that. I give it a rest and turn my attention to the chips.


The chips were very tasty and I could tell they were fresh and made in-house. We went with the mild salsa, which was decent. The only problem with the chips, and this is one of my biggest pet peeves at Mexican restaurants, is that you have to pay for them. $1.50 for a small order (pictured above) and $3.00 for large. I have a real big problem with paying for tortilla chips, obviously it's not the money, but it's just the principle. You should not have to pay for chips at a Mexican restaurant ever! I knew this going in because one of the Yelp reviews really laid into the management for making him pay for the chips and salsa. Interestingly enough, while I was there our waitress and another customer who was picking up a to go order got into it about having to pay for the chips and salsa. Obviously I'm not alone in this department. By now, I turn back to my margarita and realize the problem. There is nowhere near enough ice. This makes the margarita taste as if it's been sitting there a while. It reminded me of the 2 for 1 happy hour at Fiesta Cantina (in West Hollywood) where you order one margarita and they bring you two. By the time you get to the second one, it has been sitting around with the ice melting and causing a watered down taste. That's what this margarita reminded me of, but at only $6 I didn't have too much to complain about.

I perused the food menu a few times to see if anything jumped out. I was pleased to find they serve Camarones a la Diabla (Devil Prawns) and Camarones al Mojo de Ajo (Garlic Prawns). When I see these items on the menu I find that it's usually a good sign the cooking will be authentic. However, the one item I tend to favor when trying a new Mexican restaurant is always carnitas. Not only is it my favorite Mexican dish, but I strongly believe that the quality of a restaurant's carnitas is typically a reliable indicator for how good the rest of the food will be. One of the Yelp reviews mentioned a slight disagreement between the customer and waitress over the quality of the carnitas. The customer insisted they were over done and too crunchy while the waitress defended them as authentic. Surely enough when I asked for the carnitas the waitress first asked me if I"ve ever had carnitas. I laughed out loud, on the inside of course, and gave her a polite yes. She then proceeded to tell me that the carnitas are crispy and in chunks because that is the authentic style. To me this brought memories of store bought carnitas from a carniceria (Mexican butcher shop), so I didn't think much of it and proceeded with my order. Half an hour and another margarita later this was the dish that came out.


I did not have to taste them. Right away I knew this was not authentic carnitas. I ripped off a piece of tortilla (which you could tell was microwaved) and picked up a chunk of meat and put it in my mouth. Nope, definitely not carnitas. This tasted more like chicharonnes and had that type of texture. The rice and beans were fairly good and to be fair, the "carnitas" were not horible, but definitely a bit lacking in flavor. At $12.95 this dish is overpriced. It's always hard for me to judge carnitas, because my all time favorite are the ones cooked by my father, and frankly I don't know I'll ever taste carnitas as perfect as his. Regardless, this dish was sub-par in comparison to other carnitas I've previously tasted. I'm not sure if it's the fact that we're on the Oregon Coast, or just the work of an unskilled cook but I don't think I'd order this dish again. After deciding carnitas is not their thing, I turned to Ryan's dish to get another taste of what the restaurant has to offer. He ordered the Tacos de Camaronsitas (Oregon Bay Shrimp Tacos).


I'm not really a fan of the small baby shrimp in any dish, but I put aside any reservations in order to give this dish a fair try. I took a bite out of one of the tacos and my first reaction was that the shrimp tasted fresh, which is obviously a good thing. The flavor was decent, but I was again distracted by the microwaved and not fully warm tortillas. Ryan seemed to like them well enough, but like me, he wasn't fully convinced about the tacos either. The bill for the two dishes, two margaritas for me, two diet cokes for Ryan and an order of small chips and salsa came to $42. If I was still living in LA I would say that's a great deal. However, given the overall experience it felt a bit on the high side.


In general, my impression of this restaurant and food was average at best. Again, given my background with Mexican food, my bar may be set too high, but I honestly believe that's not the case in this situation. On the bright side, except for the carnitas, I believe my objections to the food and drinks at this restaurant can all be fixed with minor changes. However, this is the Oregon Coast, not exactly a mecca for Mexican cuisine, so around here this may pass as great Mexican food. Surprisingly Astoria has 3 other Mexican restaurants, so I am eager to compare the others to my experience at The Rio Cafe. I give this restaurant 2.5 out of 5 stars.